| View previous topic :: View next topic
:: View posts since last visit |
| Author |
Message |
mototrev
Kitebuilder of the Year 2010


Joined: 31 Jan 2009
Posts: 1574
Location: Melbourne, Australia.
|
 Posted: Thu Nov 05, 2009 6:15 am Post subject: Posted: Thu Nov 05, 2009 6:15 am Post subject: |
 |
|
| BillLamm wrote: | ... what did you use for paint ? and sail cloth?? I am doing similar things with some quad kites... (RSN and sharpies/fabric makers.. for now)
Thanks |
Sorry for the late reply. I just used sharpies for the numbers.
After reading NAKF ...thanks again Grant.
I fooled around with the balance and weight with a few blobs of blue tac.
and have been trying them out in several different wind conditions.
My ninja seem to float more than glide and geting it to turn in both directions has been a challenge.
A blob of blue tac the size of a large pea on the arrow nock did the trick of changing the balance and giving it more gliadability and steerability.
originaly I used the smallest nock I could find and drilled it to fit on the 1/8 shaft.
I've now made 3 weights one heavier and one lighter than the piece of blue tac. I amazed at how a little weight can have such a big effect.
Different weights for different conditions make sense.
A safe place to keep them.
_________________
Trev-(R)
As my wife often says: "Trev- Go fly a kite! |
|
| Back to top |
|
Fore Check
Grand Champion, Kite, & Kitebuilder of the Year 09


Joined: 15 Jun 2008
Posts: 3848
Location: The Montessori School of Kites (near Findlay, OH)
|
| Posted: Thu Nov 05, 2009 9:40 am Post subject: |
|
|
| mototrev wrote: | | Here's the five(5) skins I knocked up this week. |

Man, I like my kites, but not *that* much...

Do you know what you're expecting yet? 
_________________
Simon
Discovering Something that Doesn't Exist...
Radix Lecti Rex |
|
| Back to top |
|
mototrev
Kitebuilder of the Year 2010
Joined: 31 Jan 2009
Posts: 1574
Location: Melbourne, Australia.
|
| Posted: Thu Nov 05, 2009 11:49 am Post subject: |
|
|
| Fore Check wrote: | | mototrev wrote: | | Here's the five(5) skins I knocked up this week. |
Man, I like my kites, but not *that* much...
|
"knock up" the 3rd. definition http://dictionary.babylon.com/knock%20up
And I was startring to think there was a bit of Aussie in you Simon!
Must be on ya Mothers side.
http://en.wikipedia.org/wiki/Aussie
At least I don't ROOT for a football or Baseball team! That would be sick!
http://www.urbandictionary.com/define.php?term=root&page=3
_________________
Trev-(R)
As my wife often says: "Trev- Go fly a kite! |
|
| Back to top |
|
Spence602

Joined: 16 Sep 2003
Posts: 2056
Location: USA TX Houston
|
| Posted: Thu Nov 05, 2009 12:58 pm Post subject: |
|
|
| mototrev wrote: | Unless there is a better tape than I'm currently using?
Remember 3M stuff here is outragously expensive!
around $12.50 6mm wide 10m long
This is the $2.50 craft stuff! |
Quality costs more.
Steve's tape is quality, and will hold up under stress.
Burnish well, or whet it by applying heat to the seam.
Squiddy can probably quote the optimum time/temp, but I can't remember it offhand.
I've been flying a no-sew RYV1.6 for a long time, and the only sewing was on the appliqué.
_________________
Spence |
|
| Back to top |
|
kiteguy
Kitebuilder of the Year 2005

Joined: 16 Sep 2003
Posts: 8806
Location: USA - Kansas, Overland Park - Near Kansas City
|
| Posted: Fri Nov 06, 2009 7:26 am Post subject: |
|
|
Hey, found a link to some movies on How to Build Urban Ninja There are several "chapters"
This a link to an English online translation of a Spanish language site...not sure it will work.
http://translate.googleusercontent.com/translate_c?hl=en&ie=UTF-8&sl=es&tl=en&u=http://foro.cometas.info/index.php%3FPHPSESSID%3D0a9159f33d50d488bcdf102c59416e96%26/topic,17960.0.html&prev=_t&rurl=translate.google.com&usg=ALkJrhiEddG8txXPD4DHjyUD0XTQpaSCcQ
_________________
[
Dave Ellis
Kites + Kids = Education |
|
| Back to top |
|
KiteSquid
Master Kite Builder


Joined: 29 Aug 2003
Posts: 11696
Location: USA Virginia King George
|
| Posted: Fri Nov 06, 2009 3:24 pm Post subject: |
|
|
| Spence602 wrote: | | mototrev wrote: | Unless there is a better tape than I'm currently using?
Remember 3M stuff here is outragously expensive!
around $12.50 6mm wide 10m long
This is the $2.50 craft stuff! |
Quality costs more.
Steve's tape is quality, and will hold up under stress.
Burnish well, or whet it by applying heat to the seam.
Squiddy can probably quote the optimum time/temp, but I can't remember it offhand.
|
Not off hand, but the ambient temp, how much heat your work surface sinks, and dwell time of the iron all come into effect.
I normally iron until the F9460PC adhesive just wets out to the top surface of the fabric in what looks like little "boogers".
Read the article in Kite Lines magazine, Winter-Spring 1995, Volume 11 number 2 online HERE
_________________
VR/
KiteSquid AKA TakoIka AKA Harold of King George VA
PS Yet another post by the Squid... Doesnt he ever shut up?
PPS The wind is like the air, only pushier.
PPPS All information provided is for hobby use. None may be used commercially.
PPPPS Vir sapit qui pauca loquitur. x11.5K
PPPPPS Please excuse my speling errorors. |
|
| Back to top |
|
mototrev
Kitebuilder of the Year 2010
Joined: 31 Jan 2009
Posts: 1574
Location: Melbourne, Australia.
|
| Posted: Fri Nov 06, 2009 11:43 pm Post subject: "DS tapes ain't DS tapes" |
|
|
| KiteSquid wrote: | | Spence602 wrote: |
Quality costs more.
Steve's tape is quality, and will hold up under stress.
Burnish well, or whet it by applying heat to the seam.
Squiddy can probably quote the optimum time/temp, but I can't remember it offhand.
|
Not off hand, but the ambient temp, how much heat your work surface sinks, and dwell time of the iron all come into effect.
I normally iron until the F9460PC adhesive just wets out to the top surface of the fabric in what looks like little "boogers".
Read the article in Kite Lines magazine, Winter-Spring 1995, Volume 11 number 2 online HERE
Now I've gotta join another forum to download this artical! 
|
A quick search of those numbers
http://tapeinfo.com/TapeInfo/Datasheets/3M/2130/F9460PC.aspx
GENERAL INFORMATION
F9460PC is a 2 mil, acrylic adhesive transfer tape for bonding a variety of substrates, including most metal, sealed wood and glass, as well as many plastics, composites and painted surfaces.
Ok! Its probably used for holding the space shuttle together too, for emergency repairs in space.
Found it in Kite Studio:
http://www.kitebuilder.com/catalog/product_info.php/cPath/194_86/products_id/917?osCsid=05a45836d29f249a99297de91d12415b
Does it come in narrower widths 1/8 or 1/4?
Have either of you tried it to hold 3.9oz. dacron to RSN or poly?
I imagine it will work
dohh. more testing and experimenting. 
There was an advertisment a few years ago in Oz the catch phrase was.
"Oils ain't oils."
It appears, "DS tapes ain't DS tapes"
When time permits I'd like to give this stuff a try.
Its not like i can run down to K.S. and pick some up now! LOL!
Thanks Guys! sometimes the info. gets caught by the grey matter! LOL!
_________________
Trev-(R)
As my wife often says: "Trev- Go fly a kite! |
|
| Back to top |
|
planish

Joined: 19 Aug 2008
Posts: 3772
Location: Canada, New Brunswick, Sackville
|
| Posted: Sun Sep 05, 2010 6:12 am Post subject: |
|
|
On this part of the drawing...
... how far up the left side does the upper bridle point go? Also, shouldn't there be a pair of holes for the Z-line to go through?
(I was confused by the 190/143 and 193/234 intersection point for a while, until I realized that it meant that the LE is not to be cut straight.)
And...
How far from bottom of this piece does the lower bridle line go?
_________________
- John Rose -
In progress: Cowboy Bebop's "Ed" Ohashi Variant [done. yay!]
ToDo list: small Rok; Marilyn Monroe portrait kite; Dave Wadeson's "Mouse"; Manga Multiconos line laundry; Supersled or Pilot lifter. |
|
| Back to top |
|
mototrev
Kitebuilder of the Year 2010
Joined: 31 Jan 2009
Posts: 1574
Location: Melbourne, Australia.
|
| Posted: Sun Sep 05, 2010 6:33 am Post subject: |
|
|
I remember these questions when I made a couple...
Some of the dimentions are not obvious till you read 3 or 4 pages ahead!!!
Find the position of the renforcment patches on the spine. its in the middle of those.....
Heck I'll go and measure it.....
Just checked and If I remember correctly the lower bridle point is 20mm down from the middle panel joint measured from the edge of the lower panel.
and the upper is 110mm up from the middle panel joint....measured from the edge of the upper panel
_________________
Trev-(R)
As my wife often says: "Trev- Go fly a kite! |
|
| Back to top |
|
mototrev
Kitebuilder of the Year 2010
Joined: 31 Jan 2009
Posts: 1574
Location: Melbourne, Australia.
|
| Posted: Sun Sep 05, 2010 6:44 am Post subject: |
|
|
Just checked plans
Read section:
2 sewing the sail.
_________________
Trev-(R)
As my wife often says: "Trev- Go fly a kite! |
|
| Back to top |
|
planish
Joined: 19 Aug 2008
Posts: 3772
Location: Canada, New Brunswick, Sackville
|
| Posted: Mon Sep 06, 2010 6:48 pm Post subject: |
|
|
| mototrev wrote: | Just checked plans
Read section:
2 sewing the sail. |
Yeah, later that day I found some of that.
| Quote: | the upper bridle attachment is centered at 110 mm above the end of the black panel or 104 mm from the end of the white panel. that is 245 mm from the nose tip
|
That makes sense.
| Quote: | 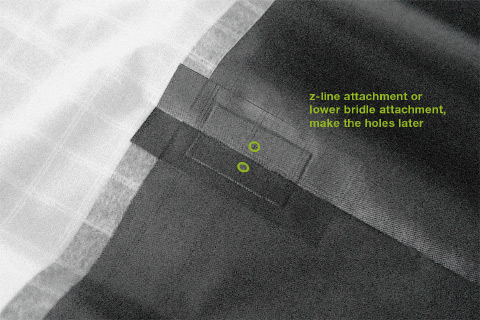
before sewing, make compound patches of an adhesive dacron 12 x 20 mm and two adhesive icarex pieces 9 x 40 mm. place the compound patches for the bridle and the z-line attachement exactly at the center fold. two of them start on the white panel, ...
|
I see two different-sized pieces there, and the larger one is at the edge of the white. They look like they are centred on each other, and the green circles are in the centre of the smaller patch. I'm not overly concerned about the sizes of the patches except that they are the only clues I can find about the location of the Z-line holes that get melted in later.
The problem then, is comparing the Icarex grid size (they say it's 10 mm) to the patches. The smaller patch with the green circles looks like it would be around 12x20 mm, but that would mean that the other 40 mm long patch is much wider than 9 mm. It's more like 40x18 mm? Or am I looking at the wrong patches?
I'm guessing that the green holes are 20 mm from the cut edge of the black, and 14 from the cut edge of the white. That seems to be confirmed by mototrev when he said "Just checked and If I remember correctly the lower bridle point is 20mm down from the middle panel joint measured from the edge of the lower panel. "
Then there's still the lower bridle point. Is the other "compound patch" supposed to be mirrored at the edge of the lower black panel, similar to the way the Z-line hole patches are at the edge of the white on the upper black panel? Again, the ambiguity of the dimensions of the compound patches becomes a problem.
 I almost prefer using "TLAR" instead of being given what appears to be very precise instructions but has missing, ambiguous, or incorrect information. I almost prefer using "TLAR" instead of being given what appears to be very precise instructions but has missing, ambiguous, or incorrect information.
_________________
- John Rose -
In progress: Cowboy Bebop's "Ed" Ohashi Variant [done. yay!]
ToDo list: small Rok; Marilyn Monroe portrait kite; Dave Wadeson's "Mouse"; Manga Multiconos line laundry; Supersled or Pilot lifter. |
|
| Back to top |
|
powder_pig
Master Kite Builder

Joined: 16 Jun 2008
Posts: 5678
Location: Portland, OR, AKA Region 9
|
| Posted: Mon Sep 06, 2010 7:43 pm Post subject: |
|
|
John, looking at the photo I'm guessing that the numbers are swapped and one patch is 12 X 40 and the other is 9 X 20. At least that's the way it appears. 
_________________
Ron
It's sunny and windy in the summer and cold and snowy in the winter...this must be what heaven is like. |
|
| Back to top |
|
planish
Joined: 19 Aug 2008
Posts: 3772
Location: Canada, New Brunswick, Sackville
|
| Posted: Tue Sep 28, 2010 10:00 pm Post subject: |
|
|
About polyester vs nylon: Dawn and dusk are the mostly likely times to find zero-wind, but that's also when there's dew, which will get the fabric wet.
So, I'm gonna get me some polyester on my next order and try another one.
_________________
- John Rose -
In progress: Cowboy Bebop's "Ed" Ohashi Variant [done. yay!]
ToDo list: small Rok; Marilyn Monroe portrait kite; Dave Wadeson's "Mouse"; Manga Multiconos line laundry; Supersled or Pilot lifter. |
|
| Back to top |
|
planish
Joined: 19 Aug 2008
Posts: 3772
Location: Canada, New Brunswick, Sackville
|
| Posted: Tue Sep 28, 2010 10:08 pm Post subject: Re: U. Ninja P. Questions |
|
|
| mototrev wrote: | | Anyone tried FSD 3mm leading Edge connectors? |
That's what I used, thinking that I had ordered them specifically for an Urban Ninja. It turns out that I meant to build a One-Oiece Cody with them. The FSD fittings angle the spreader backwards, which is probably okay, but it just doesn't look right. Then again, it moves the centre of mass backwards relative to the designed centre of mass. I'm going to fabricate some fittings out of 1/8" ID tubing (more flexible) and use them until I get some APAs.
_________________
- John Rose -
In progress: Cowboy Bebop's "Ed" Ohashi Variant [done. yay!]
ToDo list: small Rok; Marilyn Monroe portrait kite; Dave Wadeson's "Mouse"; Manga Multiconos line laundry; Supersled or Pilot lifter. |
|
| Back to top |
|
|