| View previous topic :: View next topic
:: View posts since last visit |
| Author |
Message |
Fool

Joined: 22 Oct 2004
Posts: 1525
Location: Dayton, OH
|
 Posted: Tue Nov 07, 2006 2:31 pm Post subject: Dual line sport kite details Posted: Tue Nov 07, 2006 2:31 pm Post subject: Dual line sport kite details |
 |
|
Reading ken's replies in another thread about wanting to see kite details I decided this would be a good thread conversation that could possibly be sticky'd in the future for more to see and use in their own builds.
I'm heavy into trick flying, so I'm always looking for a new idea to incorperate into the sport kites I build. Here is a picture list of the things I've taken notice of from either manufactured sport kites or homebuilt. Please join me in this discussion with your ideas and thoughts.
If I give credit to the wrong person for the idea please send me a PM and I'll correct it.
The following pictures are from Jest of Eve kites. He builds some wonderful newer styled kites with top of the line quality over in the UK.
All clickable thumbnails.
Nose
Very nice but still the posibility for snagging in backspin type manuvers.
Tail also my prefered method
Standoffs also my prefered method
These flip down out of the way for storage and are covered on the backside of the kite to Eliminate snagging.
Wingtip
Leading edge covers for yoyo manuvers also my prefered method
I believe Benson was first to use this idea but I could be wrong.
Rollbar & yoyo cage
This is a really nice setup when you are going to incorperate a rollbar or yoyo cage into your design. also my prefered method If I didn't use a yoyo stopper.
The following are from other various designers and builders.
Nose also my prefered method
This is Jason Garner's A-game Nose. I believe the Idea originated from Lam Hoac though. It's very snag free and with the right materials and craftsmanship should be indistructible. I will also note using Cordura is my prefered nose material over nylon webbing. (although sometimes I still use webbing)
Matt Brown's Nose treatment

Aerostar sportkites' shape shifter standoffs
To see the standoffs moving click on link above.
This idea I believe is patented or something or another, so if you plan on building for yourself go ahead and use it, if you plan on building to sell I'd suggest not using it. I tend to still just use two standoff connectors on the lower spreader.
Aerostar Sano Nose
Another snag free solution and a very nice one at that. Probably my second favorite idea for nose work.
The following are from Tim Benson's latest kite the Deep Space
Tail
This is an extremely clean tail section from the back side. Nearly impossible to snag. I tried this one with dacron but didn't get it the way I wanted so I haven't tried it since. I may try again with Cordura depending on the application. For ease of building I still use the other method listed.
Wing Tip
also my prefered method but I use a tension system similar to a Blue moon kites tensioner.
Tensioner also my prefered method
This is the Blue moon kites wingtip tensioning system
Yoyo stopper also my prefered method
This is Lam Hoac's Sea Devil. Photo taken by Ed on webshots.(Ezme6)
Velcro standoff attachments from our very own Dupont spinner (thanks for this nice idea Ken)
Credits
Mark @ http://www.jestofevekites.com/
Lam @ http://www.skysportdesign.com/
Jason @ http://www.outsidetheboxkitestudio.com/
Tim @ http://www.bensonkites.com/
Ken @ http://www.bluemoonkites.com/
Paul @ http://www.aerostarsportkites.com/
Ezme6 & photobill for their photos on webshots
Ken for his standoffs and Matt for his nose
ps: these are only my personal preferences of building details of dual line sport kites. For more info on framing, bridling search around on the forum. Hopefully we can expand this discussion more and possible add to it as more new ideas emerge.
_________________

Last edited by Fool on Thu Jan 25, 2007 8:55 pm; edited 7 times in total |
|
| Back to top |
|
wufer
Joined: 24 Sep 2006
Posts: 1112
Location: yorkshire uk
|
| Posted: Tue Nov 07, 2006 7:24 pm Post subject: |
|
|
| . WOW never seen such clear pics. Now all we need is the same for our REV friends. I for one would love to see closeups ov a REV in such clarity. NICE post Fool wufer |
|
| Back to top |
|
Fool
Joined: 22 Oct 2004
Posts: 1525
Location: Dayton, OH
|
| Posted: Tue Nov 07, 2006 8:27 pm Post subject: |
|
|
| wufer wrote: | | . WOW never seen such clear pics. Now all we need is the same for our REV friends. I for one would love to see closeups ov a REV in such clarity. NICE post Fool wufer |
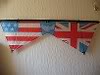
Revs are fairly straight forward. You can use the same technique for the 4 corner attachments of the sail to spar. Look into the pekr fittings that Steve sells. As for attaching them to the sail I like to use grosgrain ribbon loops sewn into rienforcement patches. This makes the points about as snag free as possible. Another thing that I do differently on my rev varients, is to use a 90 degree leading edge fitting for the upright connection to the Leading edge of the kite. More rigid and doesn't put so much stress on the lower points of the sail in case of a crash.
Here's a few detailed photos of what I'm refering to.
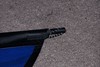
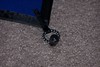
Not the best but I can work on getting some better pictures taken if you need them.
_________________
|
|
| Back to top |
|
Deliriousgym

Joined: 01 Sep 2006
Posts: 335
Location: Post Falls, ID
|
| Posted: Tue Nov 07, 2006 10:32 pm Post subject: |
|
|
Great pics!! I have seen a lot of them searching the web for ideas for my own kites. You already picked out most of my favorite design tech. It seems that simple and clean is best for the tricking. Each one of my kites has certain build features that I like as well as dislike. Great thing about building them yourself is you can incorporate all the things that work for you and eliminate what you don't like.  Good idea Fool!! Good idea Fool!!
_________________
Ecclesiastes 12:13 Let us hear the conclusion of the whole matter: Fear God, and keep His commandments: for this is the whole duty of man.
Casey Dunn
Post Falls, Idaho |
|
| Back to top |
|
stuartb
Joined: 18 Mar 2005
Posts: 37
Location: South Manchester, UK
|
| Posted: Wed Nov 08, 2006 12:06 am Post subject: |
|
|
Sorry, no pics.
I use many of these techniques as well, although none as neatly as these examples. I'm still in the stone age with noses but I am on the lookout for a source of Cordura or similar material. I have had the opportunity to inspect one of Mark's Tridents (UL #1) at close quarters and the quality of workmanship on that kite is uniformly good - he didn't just pick the best bits to photograph!
I don't use bungee for wingtip tensioning any more but use a loop of bridle line doubled as in the Blue Moon photo, except that I have had problems with durability of sewn on loops and have gone back to using holes in the leading edges.
I try to avoid having a seam on the spine by gluing the halves of the sail together then gluing a 25mm (one inch) strip of whatever the kite is made of to front and back and sewing along both edges of these strips with a 3-step zig-zag. I am not sure that the effect is as good looking as just a single seam along the spine, and the strips sometimes need to be in several pieces to match the colouring of the kite. I usually use ordinary or heavy duty glue sticks to stick panels together - they work very well with Icarex and I can wash off my mistakes.
Not really a feature that you see on the finished kite, but to lay up the halves of the wing and get them joined together accurately I use a length of thick card (same as I use for templates) that I have marked with centre line, seam widths, nose, centre-tee and tail positions for the kites that I build. The 6mm taper needed for the centre-tee to tail bit to compensate for the curvature of the spine are also marked at the tail - I don't suppose these are essential on a Nylon kite but Icarex sails have creases in them if they aren't made slightly three-dimensional like this.
Leach lines are tensioned by pulling them up to a short length of bungee looped around the centre-tee. I think this method was suggested as part of the discussions surrounding the building of the Virus but I don't know who by. The effectiveness of this system depends on how carefully the various parts that come together at the tail are assembled.
I mostly weight my kites with mild steel tube of 6mm internal diameter, but the earlier ones are going rusty so I am now experimenting with 4mm brass rod inserted inside the spine (like everyone else!). These weighting materials, as well as the bits of aluminium tube for joining spars together, all come by the metre from my local DIY shop (B&Q in the UK).
I use glue-lined heatshrink tubing to keep fittings in place and to reinforce lower spreaders at the centre tee. It forms a convincingly solid jacket round the spar but the adhesive can be softened with hot water if it needs to be removed. With two-part leading edges the stoppers don't need to be removed when dismantling the kite (unless the upper leading edge is a 101cm 3PT as in my Virus Light). |
|
| Back to top |
|
DuPont Spinner

Joined: 31 Oct 2004
Posts: 238
Location: Auburn, Wa
|
| Posted: Wed Nov 08, 2006 2:04 am Post subject: |
|
|
Thanks, Chris for picking up on my post. This is exactly what I, as well as others it appears, was looking for. I think a lot of builders continue to look for other methods to improve their kites, and it's in the details that provide a certain amount of satisfaction. Thanks again.
Ken
_________________
Wipe off the blood and get back in the game.
http://community.webshots.com/user/kenskites
Last edited by DuPont Spinner on Wed Nov 08, 2006 4:47 am; edited 1 time in total |
|
| Back to top |
|
StringDriver

Joined: 09 May 2005
Posts: 1305
Location: USA
|
| Posted: Wed Nov 08, 2006 3:37 am Post subject: |
|
|
WOW, Chris - great post...
I'm sure everyone got a look at some of that WORLD CLASS SEWING in a few
of those pics !
GEEEEEEEEEEEEEYYYYYAAAWWD, have I got a long way to go! 
Thanks for the effort (and I'm sure there was a BUNCH of effort) in putting this post together.
Ron
p.s. great to fly with you Sunday!  |
|
| Back to top |
|
FlyingWolf
Joined: 04 Jul 2006
Posts: 105
Location: Portland, OR, USA
|
| Posted: Wed Nov 08, 2006 4:41 am Post subject: |
|
|
Nice pics, I especially liked the standoffs that flip out of the way, I'll have to do some thinking about adapting that for my design with JACO sail grabbers.
I'll add my wingtip design, the LE tunel extends beyond the 'real' wingtip and the tensioning is done INSIDE by (more or less) the same method as on the blue moon shown. As the Leachline is sewn into the TE at the wingtip (and tensioned at the spine) this makes for a VERY clean tip design with no visable hardware and little, or no possibility of anything getting hung up on it.
_________________
Hans
For those who are curious: http://web.mac.com/hpraue/iWeb/Hans/Kitebag.html
For every problem there is an obvious, easy to implement WRONG solution. Corollary: most REAL solutions are neither obvious nor easy.
(adapted from H.L. Mencken) |
|
| Back to top |
|
Deliriousgym
Joined: 01 Sep 2006
Posts: 335
Location: Post Falls, ID
|
| Posted: Wed Nov 08, 2006 6:15 am Post subject: |
|
|
I realy like the Blue Moon wing tip. I going to buy one of those riveting tools to make clean strong holes in the LE tunel. I had a kite with a similar set up only it didn't have a eyelet and the hole in the tunnel wore out a little. How is Deep Space tail sewn together... man that is clean!!!
_________________
Ecclesiastes 12:13 Let us hear the conclusion of the whole matter: Fear God, and keep His commandments: for this is the whole duty of man.
Casey Dunn
Post Falls, Idaho |
|
| Back to top |
|
Fool
Joined: 22 Oct 2004
Posts: 1525
Location: Dayton, OH
|
| Posted: Wed Nov 08, 2006 1:47 pm Post subject: |
|
|
| stuartb wrote: | Sorry, no pics.
I use many of these techniques as well, although none as neatly as these examples. I'm still in the stone age with noses but I am on the lookout for a source of Cordura or similar material. I have had the opportunity to inspect one of Mark's Tridents (UL #1) at close quarters and the quality of workmanship on that kite is uniformly good - he didn't just pick the best bits to photograph!
I don't use bungee for wingtip tensioning any more but use a loop of <a href="http://www.kitebuilder.com/catalog/index.php?cPath=30">Bridle Line</a> doubled as in the Blue Moon photo, except that I have had problems with durability of sewn on loops and have gone back to using holes in the leading edges.
I try to avoid having a seam on the spine by gluing the halves of the sail together then gluing a 25mm (one inch) strip of whatever the kite is made of to front and back and sewing along both edges of these strips with a 3-step zig-zag. I am not sure that the effect is as good looking as just a single seam along the spine, and the strips sometimes need to be in several pieces to match the colouring of the kite. I usually use ordinary or heavy duty glue sticks to stick panels together - they work very well with Icarex and I can wash off my mistakes.
Not really a feature that you see on the finished kite, but to lay up the halves of the wing and get them joined together accurately I use a length of thick card (same as I use for templates) that I have marked with centre line, seam widths, nose, centre-tee and tail positions for the kites that I build. The 6mm taper needed for the centre-tee to tail bit to compensate for the curvature of the spine are also marked at the tail - I don't suppose these are essential on a Nylon kite but Icarex sails have creases in them if they aren't made slightly three-dimensional like this.
Leach lines are tensioned by pulling them up to a short length of bungee looped around the centre-tee. I think this method was suggested as part of the discussions surrounding the building of the Virus but I don't know who by. The effectiveness of this system depends on how carefully the various parts that come together at the tail are assembled.
I mostly weight my kites with mild steel tube of 6mm internal diameter, but the earlier ones are going rusty so I am now experimenting with 4mm brass rod inserted inside the spine (like everyone else!). These weighting materials, as well as the bits of aluminium tube for joining spars together, all come by the metre from my local DIY shop (B&Q in the UK).
I use glue-lined heatshrink tubing to keep fittings in place and to reinforce lower spreaders at the centre tee. It forms a convincingly solid jacket round the spar but the adhesive can be softened with hot water if it needs to be removed. With two-part leading edges the stoppers don't need to be removed when dismantling the kite (unless the upper leading edge is a 101cm 3PT as in my Virus Light). |
I picked up Cordura on Ebay.
With this discussion I'm trying to stay away from how people build their seams. Everyone has their own preference on that topic and it has been widely discussed already. Although I do however suggest building the spine backed with a mylar strip or some sort of reinforcement to reduce nose to tail stretch since no one I know releases that spine tension for storing.
I agree with most of your techniques and really think we should try to find a picture tutorial if you will of the tail taper solution for the icarex pucker between the standoffs and center T. I'll see what I can dig up in the old Virus archives. 
_________________
|
|
| Back to top |
|
Fool
Joined: 22 Oct 2004
Posts: 1525
Location: Dayton, OH
|
| Posted: Wed Nov 08, 2006 1:56 pm Post subject: |
|
|
| FlyingWolf wrote: | Nice pics, I especially liked the standoffs that flip out of the way, I'll have to do some thinking about adapting that for my design with JACO sail grabbers.
I'll add my wingtip design, the LE tunel extends beyond the 'real' wingtip and the tensioning is done INSIDE by (more or less) the same method as on the blue moon shown. As the Leachline is sewn into the TE at the wingtip (and tensioned at the spine) this makes for a VERY clean tip design with no visable hardware and little, or no possibility of anything getting hung up on it. |
It's really easy to incorperate using jaco fittings over the other ones pictured. It's just a matter of making the hole bigger on the flaps.
As for the idea of a covered tip. I have tried that in the past and found it to get too messy around my local area. When it rains the fields are often muddy and a tip stab would sometimes shove that mud into my leading edge tunnel with a covered wingtip area. Often when it's raining I'll cover my wing tips with a long "dorsal cap" (end cap) to prevent too much mud from caking up on the tension lines. I always store my kites with the leading edges untensioned though. Please post a picture when you get time however because others may want to use this idea.
Also I should note that with the Blue moon tensioners I tuck the "tags" back into the tight lines
_________________
|
|
| Back to top |
|
Fool
Joined: 22 Oct 2004
Posts: 1525
Location: Dayton, OH
|
| Posted: Wed Nov 08, 2006 2:02 pm Post subject: |
|
|
| Deliriousgym wrote: | | Great pics!! I have seen a lot of them searching the web for ideas for my own kites. You already picked out most of my favorite design tech. It seems that simple and clean is best for the tricking. Each one of my kites has certain build features that I like as well as dislike. Great thing about building them yourself is you can incorporate all the things that work for you and eliminate what you don't like. Good idea Fool!! |
I agree with this, hopefully we can get some more techniques with clear photos to add to this since these were mainly just my prefered method. I'm sure their are other better designs for different types of kites. I build all of my kites around trick flying though since that is what I do the most.
_________________
|
|
| Back to top |
|
Fool
Joined: 22 Oct 2004
Posts: 1525
Location: Dayton, OH
|
| Posted: Wed Nov 08, 2006 5:44 pm Post subject: |
|
|
Ok, here's a picture explanation of what Stuartb refered to when talking about sail wrinkles around the center-t and standoffs.
Christian Derefat's Virus Template
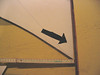
You'll notice a black straight edge has been lined up with the edge of the template along the center seam. Then at the bottom where the tail comes into a point there has been a slight curve of material removed from the template. This straightens out the keel of the kite and makes it tight between the spine and standoffs when assembled. With nylon over time it will stretch and straighten itself out but with poly it will not. This is a very useful technique.
_________________
|
|
| Back to top |
|
Deliriousgym
Joined: 01 Sep 2006
Posts: 335
Location: Post Falls, ID
|
| Posted: Wed Nov 08, 2006 8:00 pm Post subject: |
|
|
| Fool wrote: | Ok, here's a picture explanation of what Stuartb refered to when talking about sail wrinkles around the center-t and standoffs.
Christian Derefat's Virus Template
You'll notice a black straight edge has been lined up with the edge of the template along the center seam. Then at the bottom where the tail comes into a point there has been a slight curve of material removed from the template. This straightens out the keel of the kite and makes it tight between the spine and standoffs when assembled. With nylon over time it will stretch and straighten itself out but with poly it will not. This is a very useful technique. |
What if your center panel is one piece and not sewn in the center and your using pc-31? Is it better to have a two piece center panel?
_________________
Ecclesiastes 12:13 Let us hear the conclusion of the whole matter: Fear God, and keep His commandments: for this is the whole duty of man.
Casey Dunn
Post Falls, Idaho |
|
| Back to top |
|
Fool
Joined: 22 Oct 2004
Posts: 1525
Location: Dayton, OH
|
| Posted: Wed Nov 08, 2006 8:37 pm Post subject: |
|
|
| Deliriousgym wrote: | | What if your center panel is one piece and not sewn in the center and your using pc-31? Is it better to have a two piece center panel? |
Well it's strictly a preference thing but I always build my dual line kites with a 2 peice center. I use a french seam to join the two halves to help keep stretching to a minimum.
Although if the keel is wide (standoffs spaced outwards from spine) you can usually get away with a single panel center without too much of an issue of wrinkling.
Another idea would be to build the sail with some slack in it by shortening either your lower spreaders or standoffs. Both have different effects on how the kite handles.
Lastly you could sew a "dart" into the tail section, along the spine, that would end up being covered by reinforcement material and would acheive the same results.
_________________
|
|
| Back to top |
|
stuartb
Joined: 18 Mar 2005
Posts: 37
Location: South Manchester, UK
|
| Posted: Wed Nov 08, 2006 8:41 pm Post subject: |
|
|
| Deliriousgym wrote: |
What if your center panel is one piece and not sewn in the center and your using pc-31? Is it better to have a two piece center panel? |
If the Dacron tail/spine reinforcement goes from tail to centre-tee in one piece, as mine generally do, then you could just cut along the spine line from tail to centre-tee and overlap the edges by about 12mm (half an inch) at the tail, tapering to zero where the cut ends at the centre-tee. All that unpleasantness will then be covered up and held in place by the Dacron.
If you don't join the tail to the centre-tee in one piece of Dacron, then following Fool's advice to reinforce the spine with Mylar or mine to reinforce it with two layers of the sail material means that you would still end up with the taper covered up and sewn together.
One other point is that the sail no longer lays flat when you put this taper in, so you'll probably want to get the sail laid out and sewn together from the nose to the centre-tee before sorting out the tapered bit from centre-tee to tail.
Hope that's clear, because it's an expensive cut if you're using Icarex! (And is probably not needed if you are using Nylon.) |
|
| Back to top |
|
Deliriousgym
Joined: 01 Sep 2006
Posts: 335
Location: Post Falls, ID
|
| Posted: Wed Nov 08, 2006 11:32 pm Post subject: |
|
|
That make sense. 1/2 " seem a bit much but what do I know? It sounds like a two piece center panel is the only way to go. This is getting off topic sorry Fool, but how big should my seem allowance be on my spine seem?
_________________
Ecclesiastes 12:13 Let us hear the conclusion of the whole matter: Fear God, and keep His commandments: for this is the whole duty of man.
Casey Dunn
Post Falls, Idaho |
|
| Back to top |
|
Fool
Joined: 22 Oct 2004
Posts: 1525
Location: Dayton, OH
|
| Posted: Thu Nov 09, 2006 1:08 am Post subject: |
|
|
| Deliriousgym wrote: | | That make sense. 1/2 " seem a bit much but what do I know? It sounds like a two piece center panel is the only way to go. This is getting off topic sorry Fool, but how big should my seem allowance be on my spine seem? |
If it's a french type seam I use a 1/2" on both panels then double roll to a 1/4" overlap. You can offset the seam so that the overlap is directly over the center of the spine. If you use a lap type seam you only need 3.5mm on both panels which overlaps to 7mm wide. If you use a center section panel like Stuartb then that's up to how much width you want that center panel to be.
_________________
|
|
| Back to top |
|
Jest_of_EVE

Joined: 09 Nov 2006
Posts: 2
Location: UK
|
| Posted: Thu Nov 09, 2006 4:50 pm Post subject: |
|
|
Hey!
Thanks for the good words about my kites.
Thought I'd drop in and say that although I like the 3-piece nose for it's clean edge, I don't enjoy the construction much! It's always the last stitching job at the end of a long day and requires concentration.
I've been working on a 1-piece nose along similar lines and have just added it to my own Trident.
Bit of a hash job, but it's hard to teach a used kite a new nose!
The excess material is left sticking up at the back of the sail and rather than hot-cut it away, I'm going to give it a test-fly. I'm thinking, although it's a long shot, that this might act as a stabliser of sorts in flight.
I did say 'longshot'! Can't see it being snag-fodder yet, but if it turns out to be useless then it can be easily hotcut away.
Mark
_________________
"If a thing's worth doing, it's worth doing right." |
|
| Back to top |
|
Pumpkin

Joined: 30 Oct 2006
Posts: 7991
Location: Birmingham UK
|
| Posted: Thu Nov 09, 2006 7:51 pm Post subject: |
|
|
| stuartb wrote: | | I mostly weight my kites with mild steel tube of 6mm internal diameter, but the earlier ones are going rusty so I am now experimenting with 4mm brass rod inserted inside the spine (like everyone else!). |
Please excuse a stupid question but why do you add weight?
_________________
Pete
Where did you say the string goes? |
|
| Back to top |
|
|