|
| View previous topic :: View next topic
:: View posts since last visit |
| Author |
Message |
Progcraft
Kitebuilder of the Year 2004


Joined: 29 Sep 2003
Posts: 4963
Location: Calgary, AB, Canada
|
 Posted: Thu Dec 30, 2004 9:25 pm Post subject: Posted: Thu Dec 30, 2004 9:25 pm Post subject: |
 |
|
| Stan wrote: | Dyneema (DSM) = Spectra (Allied-Signal).
They are both (as Kitesquid might say  ) registered trademarks for high-modulus or ultra-high density polyethylene line. ) registered trademarks for high-modulus or ultra-high density polyethylene line. |
Thanks Stan. That's good news for me 
P.
_________________
There is no box.
--------------------
The invisible and the non-existent look very much alike
- Delos B. McKown |
|
| Back to top |
|
Progcraft
Kitebuilder of the Year 2004
Joined: 29 Sep 2003
Posts: 4963
Location: Calgary, AB, Canada
|
| Posted: Fri Dec 31, 2004 2:40 am Post subject: |
|
|
YES!!
NOW, it looks like a kite (without the bridle)
I found my first non-intended behaviorial induced deviation from established plan.
In my excitedness to close the kite last night, I forgot to stitch the seam flap down on the previous cell.
Oh well, it will be fine.
Now, to admire it for a while, then dive into the bridle.
Pictures forth comeing hencewise from now. 
P
_________________
There is no box.
--------------------
The invisible and the non-existent look very much alike
- Delos B. McKown |
|
| Back to top |
|
Progcraft
Kitebuilder of the Year 2004
Joined: 29 Sep 2003
Posts: 4963
Location: Calgary, AB, Canada
|
| Posted: Fri Dec 31, 2004 4:16 am Post subject: |
|
|
G'day all.
The next few posts will be pictures and some explantions. This is the first kite of this type I've built, and I learned a great deal. There are a few web pages out there that describe the building process, but I believe the more info you can get, the better off you'll be. So, I hope that I can share something you may find usefull.
Bridle tabs are made from 3/4" wide strips of fabric, triple folded and zig-zaged. Cut 1 3/4" long. Folded and taped in place.
The sewing order: I sewed the kite left to right (as your looking at the face of the kite, LE up) and I did it cell by cell. Useing this method turned out to be very nice. At no time did I ever have to put any bulk of fabric under the arm of the sewing machine.
I wanted to use double sided tape, but the stuff I have does not stick well to this fabric. Hot-tacking just didn't hold. So, I pre-sewed some pieces together first. This made the overall process much easier, but took somewhat longer.
I start by sewing the bottom skins togther. Good sides together. The panel being added is on top.
Each piece has a DOT marked on it. The bridle tabs are taped to a dot
(in this pictue, the grey looking piece is actually the top skin, it just happend to be underneath. pay no attention to it)
Line up the dot on the next panel and clip into place.
I pre-sew these pieces together, 1/8" in from the edge. Now, this is not a very necessary step on the bottom skins. But, as a novice, it was helpfull.
The ribs also have dots on them.
Again, line up the dots and clip in place. Judge for seam allowance along the curve.
Fiddle around and get everything lined up so the lines cross, the edges line up, and things are flat. Plunge the needle and start sewing.
Once the straight has been sewn, the flap was zig-zaged onto the rib.
And that takes care of the bottom of the cell. See the bridle tab at the top.
When sewing the bottom cells together, I found the important part is to align the edges of the pieces.
Continued....
_________________
There is no box.
--------------------
The invisible and the non-existent look very much alike
- Delos B. McKown |
|
| Back to top |
|
Progcraft
Kitebuilder of the Year 2004
Joined: 29 Sep 2003
Posts: 4963
Location: Calgary, AB, Canada
|
| Posted: Fri Dec 31, 2004 4:17 am Post subject: |
|
|
Next, I sew the top skins together. This will close the cell.
In this step, I think the important part is to align the leading edges. This, you will see, creates an interesting sewing oppurtunity.
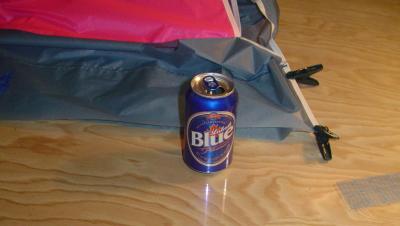
So, have a beer before you proceed.
Now, the edges of the panels are both curved, and the curve opposite ways (becasue the fabric is good side to good side). Pre-sewing these two pieces together was a big help. Not only did it make the next step easier, it made it possible.
Sewing the rib onto this already curving piece is a challenge. Depending on where you are on the kite (center or tip), there is more or less curvature. In this picture, you'll see the rib is pointing in almost entirely the opposite direction.
It's a matter of make one or two stitchs, adjust the farbric, roll another one or stitches, adjust,.....
Eventually, you get to the straight part.
This seam flap is sewn down on the newly added top panel.
And that's a full cell completed.
The foilmake plans were most excellent in quality and precision. This is the raw trailing edge of the kite. Notice that both top and bottom skins are flat and tight. Good quality plans that foilmaker.
Continued
_________________
There is no box.
--------------------
The invisible and the non-existent look very much alike
- Delos B. McKown |
|
| Back to top |
|
Progcraft
Kitebuilder of the Year 2004
Joined: 29 Sep 2003
Posts: 4963
Location: Calgary, AB, Canada
|
| Posted: Fri Dec 31, 2004 4:17 am Post subject: |
|
|
Finally, the last cell.
I rolled the kite into a spiral small enough to fit into the cell. The, I used a zip tip to hold it.
Tape the bridle tabs to the skin, line up the edges and sew it closed. That's it. Done.
The last step was to trim the trailing edge. Not much trimming required.
The binding ins 1" wide dacron, signle folded.
And viola, the finished kite skin.
There are numerous ways to handle the kite as it gets bigger and bigger. This is one of the lesser effective methods.
Next, the bridle. That'll be tommorrow.
Hopefully I'll get the test flight in before dark. Hopefully
I hope the preceeding was of some benifit to someone out there.
Cheers ya'll.
_________________
There is no box.
--------------------
The invisible and the non-existent look very much alike
- Delos B. McKown
Last edited by Progcraft on Fri Dec 31, 2004 5:38 am; edited 1 time in total |
|
| Back to top |
|
wdrwilson
Joined: 25 Oct 2003
Posts: 1696
Location: Canada, Nova Scotia, Halifax
|
| Posted: Fri Dec 31, 2004 4:43 am Post subject: |
|
|
 
Well done Terry!!! Thanks for sharing.. I know it takes a lot of effort to put something like this together. I am sure it will be a help to others who attempt to build a foil like this.!!
--Bill |
|
| Back to top |
|
KiteSquid
Master Kite Builder


Joined: 29 Aug 2003
Posts: 11696
Location: USA Virginia King George
|
| Posted: Fri Dec 31, 2004 2:05 pm Post subject: |
|
|
Yes Terry!!!!!! Thanks for the series of photos!!!!!!!
Nice!!!!!
BTW I like your black weight you used to hold the layers.
Why did'nt you use about 12 of the blue weights?????
_________________
VR/
KiteSquid AKA TakoIka AKA Harold of King George VA
PS Yet another post by the Squid... Doesnt he ever shut up?
PPS The wind is like the air, only pushier.
PPPS All information provided is for hobby use. None may be used commercially.
PPPPS Vir sapit qui pauca loquitur. x11.5K
PPPPPS Please excuse my speling errorors. |
|
| Back to top |
|
Progcraft
Kitebuilder of the Year 2004
Joined: 29 Sep 2003
Posts: 4963
Location: Calgary, AB, Canada
|
| Posted: Fri Dec 31, 2004 3:24 pm Post subject: |
|
|
I think I used up to 24 of the Blue weights during construction
Funny thing about the Dacron edge binding on the TE. And a good lesson in 'always estimate long'.
I did just a quick layout to see how much 3" wide Dacron I had. I figured I could cut what I had into 3 one inch strips and be left with about 3 to 4 feet when I'm done.
Well, when I was done, I had just under 6 inchs of dacron left. Close call that.
I should try to make a deal with someone here. I'll make the kites. Then send them to you for bridleing. I don't like this part as much as the rest of the hobby. I'm not sure why though. Well, guess I should get to it then eh.
P
_________________
There is no box.
--------------------
The invisible and the non-existent look very much alike
- Delos B. McKown |
|
| Back to top |
|
KiteSquid
Master Kite Builder
Joined: 29 Aug 2003
Posts: 11696
Location: USA Virginia King George
|
| Posted: Fri Dec 31, 2004 4:02 pm Post subject: |
|
|
You gotta learn the knots!!!!!!
or make simpler kites
_________________
VR/
KiteSquid AKA TakoIka AKA Harold of King George VA
PS Yet another post by the Squid... Doesnt he ever shut up?
PPS The wind is like the air, only pushier.
PPPS All information provided is for hobby use. None may be used commercially.
PPPPS Vir sapit qui pauca loquitur. x11.5K
PPPPPS Please excuse my speling errorors. |
|
| Back to top |
|
Progcraft
Kitebuilder of the Year 2004
Joined: 29 Sep 2003
Posts: 4963
Location: Calgary, AB, Canada
|
| Posted: Fri Dec 31, 2004 4:19 pm Post subject: |
|
|
| Kitesquid wrote: | You gotta learn the knots!!!!!!
|
Knot unless I go notless. Wait, errr, yeah, something like that 
_________________
There is no box.
--------------------
The invisible and the non-existent look very much alike
- Delos B. McKown |
|
| Back to top |
|
smarties
Kite Builder II


Joined: 06 Nov 2003
Posts: 2813
Location: Dieppe, NB, Canada
|
| Posted: Fri Dec 31, 2004 5:10 pm Post subject: |
|
|
Thanks for sharing Progcraft! It's a lot of work to build this kite but also a lot of work to put the pictures together and share it with the information.
Soon, you'll be able to take all you posts and make a kite book out of it. 
_________________
Smarties 
http://www.yvonhache.com
To boldly go where no imagination as gone before!  |
|
| Back to top |
|
Progcraft
Kitebuilder of the Year 2004
Joined: 29 Sep 2003
Posts: 4963
Location: Calgary, AB, Canada
|
| Posted: Fri Dec 31, 2004 8:15 pm Post subject: |
|
|
Thanks guys. And your welcome Like I said, the more info that 's available, the easy it is to decide what you want to do.
Would someone with Tom White's NPW Vulture calculator mind telling me how much Bridle Line is required for a 5m kite? Total length is calculated on one of the pages there. Thank you very much
The Junkie uses a total of 74 meters for the primaries, and 53 meters for the secondaries.
36 individual primary lines, and 15 secondary lines.
Total count is 51 lines and 127 meters.
Cheers,
P.
_________________
There is no box.
--------------------
The invisible and the non-existent look very much alike
- Delos B. McKown |
|
| Back to top |
|
mhartzel
Joined: 09 Dec 2003
Posts: 959
Location: USA, Michigan, Fraser
|
| Posted: Fri Dec 31, 2004 9:06 pm Post subject: |
|
|
i posted the specs in the 'Need a knot' thread....
to recap....
according to Tom's calulator for the 9b a 5m would use approx 123m of line for the classic bridle using 30kg line.
using the cascade...38.2 primary or 45kg and 55.8 of 30kg
_________________
Mark
Sand, Street or Sky... I love to fly.
 |
|
| Back to top |
|
Progcraft
Kitebuilder of the Year 2004
Joined: 29 Sep 2003
Posts: 4963
Location: Calgary, AB, Canada
|
| Posted: Fri Dec 31, 2004 10:25 pm Post subject: |
|
|
Thank you Mark
So, it looks like this Junkie has significantly more bridle. The good thing is, I'm useing a much lighter and thinner line then that used on my NPW's.
P
_________________
There is no box.
--------------------
The invisible and the non-existent look very much alike
- Delos B. McKown |
|
| Back to top |
|
Progcraft
Kitebuilder of the Year 2004
Joined: 29 Sep 2003
Posts: 4963
Location: Calgary, AB, Canada
|
| Posted: Sat Jan 01, 2005 1:23 pm Post subject: |
|
|
Well, most of the bridle is completed now. I just need to add the secondaries (the easiy part). I tell ya, I sooooo much prefer knotless loops
Nothing like flying a new kite on the first day of the new year eh
Cheers,
P.
_________________
There is no box.
--------------------
The invisible and the non-existent look very much alike
- Delos B. McKown |
|
| Back to top |
|
Progcraft
Kitebuilder of the Year 2004
Joined: 29 Sep 2003
Posts: 4963
Location: Calgary, AB, Canada
|
| Posted: Sat Jan 01, 2005 3:25 pm Post subject: |
|
|
| smarties wrote: |
Soon, you'll be able to take all you posts and make a kite book out of it. |
This forum is my kite book and my log book
_________________
There is no box.
--------------------
The invisible and the non-existent look very much alike
- Delos B. McKown |
|
| Back to top |
|
Progcraft
Kitebuilder of the Year 2004
Joined: 29 Sep 2003
Posts: 4963
Location: Calgary, AB, Canada
|
| Posted: Sat Jan 01, 2005 4:14 pm Post subject: |
|
|
The kite, it is complete.
The sun, it has risen
The wind, ummm, what wind??
The temperature, to freaking cold for any sane man to go kite flying.
Must wait, till later.
The kite, it is complete
The builder, he is happy
Coffee, must drink more 
P.
_________________
There is no box.
--------------------
The invisible and the non-existent look very much alike
- Delos B. McKown |
|
| Back to top |
|
CJQ
Grand Champion, Kitebuilder of the Year 2006


Joined: 27 Dec 2003
Posts: 4954
Location: Coopersburg, PA - USA
|
| Posted: Sat Jan 01, 2005 4:28 pm Post subject: The Kites Complete |
|
|
T , couple of things , If it's cold dress warmer , if there ain't no wind RUN, as far as a drink forget the coffee, break out the bubbly stuff (any left over from last night ??) celebrate !!! great job well done thanks for sharing the details.
CLIFF |
|
| Back to top |
|
Progcraft
Kitebuilder of the Year 2004
Joined: 29 Sep 2003
Posts: 4963
Location: Calgary, AB, Canada
|
| Posted: Sat Jan 01, 2005 4:36 pm Post subject: Re: The Kites Complete |
|
|
| CJQ wrote: | | If it's cold dress warmer , |
Only Eskimos and Mountain Men know how to dress warm enough for this weather
_________________
There is no box.
--------------------
The invisible and the non-existent look very much alike
- Delos B. McKown |
|
| Back to top |
|
Progcraft
Kitebuilder of the Year 2004
Joined: 29 Sep 2003
Posts: 4963
Location: Calgary, AB, Canada
|
| Posted: Sat Jan 01, 2005 9:00 pm Post subject: |
|
|
Brideling the kite:
The sacrificial line sets
Marking the lines. Make two lines at at time.
All primary and secondary lines marked, cut, and ready for knots. Each piece of blue tape is around two lines.
Useing bowline knots on the free end.
Bowline knots around the bridle tab
The center of the kite, bridle lines attached.
The mass of loops that is to become the left power lines. 3 outside lines to ribs 1 - 11, 3 for ribs 13, 15, 17, then three more for the cross to the othersides 13, 15, `7 ribs.
The cross bridle.
The completed bridle. The pigtails are larks headed to each other, then to a bridle tab. This keeps them neat and orderly and prevents tangleing.
The rolled packed.
The bag is a red, drawstring bag.
<sigh> Still no wind at all.
Cheers,
P.
_________________
There is no box.
--------------------
The invisible and the non-existent look very much alike
- Delos B. McKown |
|
| Back to top |
|
|
View posts since last visit
|
You cannot post new topics in this forum
You cannot reply to topics in this forum
You cannot edit your posts in this forum
You cannot delete your posts in this forum
You cannot vote in polls in this forum
|
|