| View previous topic :: View next topic
:: View posts since last visit |
| Author |
Message |
R Moore
Master Kite Builder


Joined: 16 Sep 2005
Posts: 934
Location: Australia, NSW, Baulkham Hills
|
 Posted: Sat Aug 08, 2009 2:52 pm Post subject: Posted: Sat Aug 08, 2009 2:52 pm Post subject: |
 |
|
Good ideas Dave. I use dowels occasionally for making smaller kites up to 20 sq ft when testing new designs or making first kites for kids that may not keep them more than a few years. I have a limited budget like most kite builders and it's not always possible to get F/G or carbon tube but I am always able to get dowel at a number of hardware stores near me. I usually accumulate lots of dowel, bamboo and square wood spars. Most of my kites have the spars inside the pockets and are not visible. I must try the bees wax. I wonder if varnish or some other coating would seal the wood. Perhaps epoxy paint. Of course we can make some kites for next to nothing from paper and wood skewers but they may not be very durable. One of my best flying kites was made with 1.8 meter garden bamboo stakes and material grade ripstop. Wouldn't stand up to scrutiny at a kite festival but then I wouldn't enter it in any comps.
It may be interesting to see who can make the cheapest but best looking kite.
_________________
BOB MOORE |
|
| Back to top |
|
Jeepster

Joined: 11 Jul 2008
Posts: 1100
Location: Queen Creek, Arizona
|
| Posted: Sat Aug 08, 2009 4:32 pm Post subject: |
|
|
| BANSHEE wrote: | | When securing a banner pole in sand instead of a piece of rebar, cut a pice of eiher 11/2" or 2" pcv pipe, cut and angle on one end to help drive it into the sand and drop your pole into the pvc tube. This remains a lot more secure than a piece of rebar, also a lot lighter to carry than 10' of rebar stakes. |
I've noticed the IKE members using a fiberglass rod instead of rebar. The rods are 3/8 inch in diameter, four feet long and flexible ... so they help absorb some of the wind gusts. They're much lighter than rebar and they're cheap ... $1.09 at Tractor Supply. They're listed as Sun Guard II Fiberglass Posts on the Tractor Supply web site, but I'm sure they're available in other farm supply stores or fencing supply stores.
A small piece of 3/8 inch ID hose around the rod also helps reduce internal wear on the banner poles.
Cheers,
Tom |
|
| Back to top |
|
mototrev
Kitebuilder of the Year 2010


Joined: 31 Jan 2009
Posts: 1574
Location: Melbourne, Australia.
|
| Posted: Mon Sep 21, 2009 11:35 am Post subject: |
|
|
I thought this might be relevant to this thread as I have had problems since I learnt to sew on mum's old Singer as an 8 yr. old 40 yr. ago.
The angle of the speed controler just seemed wrong. Yes it does do what its meant to do, its just uncomfotable in opperating it, So here the soloution to unergonomical foot controlers on a seewing machine.
The frame is new as I was sick of chasing the block of wood around the floor of the shed!!

Ahh! much better...

_________________
Trev-(R)
As my wife often says: "Trev- Go fly a kite! |
|
| Back to top |
|
kiteguy
Kitebuilder of the Year 2005

Joined: 16 Sep 2003
Posts: 8805
Location: USA - Kansas, Overland Park - Near Kansas City
|
| Posted: Mon Sep 21, 2009 2:45 pm Post subject: |
|
|
Thanks for the photo, Trev(r). And the idea. I have got to figure a way to keep mine from sliding around the slick floor in my Kite Cavern.
Oh, you might think about trying an idea that lots of people use....sewing barefoot. That way you get a better feel for the pedal than just stomping down with the clod hopper. 
The cold concrete floor in my KC is not conducive to bare (bear?) feet. So I have a pair of soft leather moccasins that I use instead. 
_________________
[
Dave Ellis
Kites + Kids = Education |
|
| Back to top |
|
pounetbf

Joined: 19 Apr 2008
Posts: 1361
Location: France
|
| Posted: Mon Sep 21, 2009 5:59 pm Post subject: |
|
|
| Jeepster wrote: |
I've noticed the IKE members using a fiberglass rod instead of rebar.
A small piece of 3/8 inch ID hose around the rod also helps reduce internal wear on the banner poles.
Tom |
another good solution is to use an old ski pole
Light, rigid, and sharp enough.
At the end of the winter I visit the shops renting ski. They generally have old poles, no more usable as slightly bended, and good for the garbge bin. I can recycle them for free 
_________________
Flying kites to add colors in the sky |
|
| Back to top |
|
twelvewinds
Master Kite Builder

Joined: 19 Oct 2005
Posts: 2140
Location: Mechanicsburg, PA
|
| Posted: Sat Nov 14, 2009 8:29 pm Post subject: |
|
|
| Hi everybody, I've got a request. The spring issue of KITING is going to focus on kitemaking, and I want to include an article with as many tips & tricks as possible. Basically, I want to turn this thread into a magazine article. So can we step it up here? Anything you've got, any little idea that has helped you out, any wacky thought that improves your kites, whether it's related to anything else in this thread or not, whaddaya say you contribute it ASAP? For instance, last year Kevin Shannon showed me how to take edge binding and fold it back on itself, thus reinforcing a corner with two extra layers of fabric (before burning a hole through it). I know you've all got something to say. Can you help me out? |
|
| Back to top |
|
powder_pig
Master Kite Builder

Joined: 16 Jun 2008
Posts: 5678
Location: Portland, OR, AKA Region 9
|
| Posted: Sun Nov 15, 2009 12:20 am Post subject: |
|
|
| twelvewinds wrote: | | Hi everybody, I've got a request. The spring issue of KITING is going to focus on kitemaking, and I want to include an article with as many tips & tricks as possible. Basically, I want to turn this thread into a magazine article. So can we step it up here? Anything you've got, any little idea that has helped you out, any wacky thought that improves your kites, whether it's related to anything else in this thread or not, whaddaya say you contribute it ASAP? For instance, last year Kevin Shannon showed me how to take edge binding and fold it back on itself, thus reinforcing a corner with two extra layers of fabric (before burning a hole through it). I know you've all got something to say. Can you help me out? |
| powder_pig wrote: |
Simon, I had the same problem of not being able to use the folder in my sewing machine and I solved it by cutting the strips and pulling them through the folder and under the iron on low heat on the ironing board. I do bunches at a time and it takes no time at all. Then I just feed them onto my fabric in the sewing machine all folded.
Hem strips that I did all at once. |
_________________
Ron
It's sunny and windy in the summer and cold and snowy in the winter...this must be what heaven is like. |
|
| Back to top |
|
dj2
Joined: 12 Nov 2005
Posts: 203
Location: Seattle Washington USA
|
| Posted: Sun Nov 15, 2009 10:52 pm Post subject: Hemostats plus knots |
|
|
On page 1 of this thread Kitesquid tells how to place knots on a specific spot on a cord using a hemostat.
I finally got my hands on a hemostat and tried it. Works great! Thanks for the tip. |
|
| Back to top |
|
Fore Check
Grand Champion, Kite, & Kitebuilder of the Year 09


Joined: 15 Jun 2008
Posts: 3848
Location: The Montessori School of Kites (near Findlay, OH)
|
| Posted: Sun Nov 15, 2009 11:09 pm Post subject: |
|
|
Use that frustrating Rolled Hem Foot for something worthwhile: Edge Binding 
You pre-fold the edge binding and then apply the folded strip to the sail edge in a single pass with zig zag stitching (I use a triple zig-zag. Personally, I play with the width of the stitch to get as much left-to-right coverage of the binding as I safely can to get one side of the zigzag pretty close to the edge of the sail and the other side of the stitch pretty close to the inside edge of the binding strip. Then I lengthen the stitch out so that zigzag angle is 45 degrees or greater; I've seen 60 degrees plus; you just need to hold it on there, really. "That Looks About Right" applies.)
After you pre-fold the binding strip, you feed it into the machine and then feed the sail panel into the crease and hold the sail panel tight against the inside of the crease on the binding. It helps tremendously to have some sort of fence or guide to keep the binding going relatively straight through the needle area and also give you something to push (gently) against to make sure the sail is up in there. It takes some practice to do consistently and quickly, but believe me - I'm all thumbs and I'm comfortable with it.
Here's a series of pics that I took a while back that describes the process. In these photos, I was using a Rolled Hem foot on my sewing machine to provide the Fence/Guide for edge binding - it has a little lip thing on the right-hand-bottom of the foot that works OK for this. Since that time I've found a different foot with an adjustable guide that I like better (It's an Adjustable Blind Hem foot.) I've seen examples of people using a fence made up of multiple strips of masking tape laid on a single line on the sewing machine so that they build up a thickness of 1/8" (ish) to provide the fence.
First, you pre-fold the edging strip and wrap it around the sail edge like this. These pics I'm using a 1" strip of 1.5 oz RSN single-folded on a piece of white 1.5 oz RSN. If you use double folded edging or edging of another material, the method still applies (your edging strip will just look different).
Slide the sail up into the peak of the crease to get started.
Then place the start of the stitch run up in the machine, positioning the outside (folded) edge of the binding up against your fence/guide. Again, the bottom lip on the rolled hem foot is providing the fence for me in this pic.
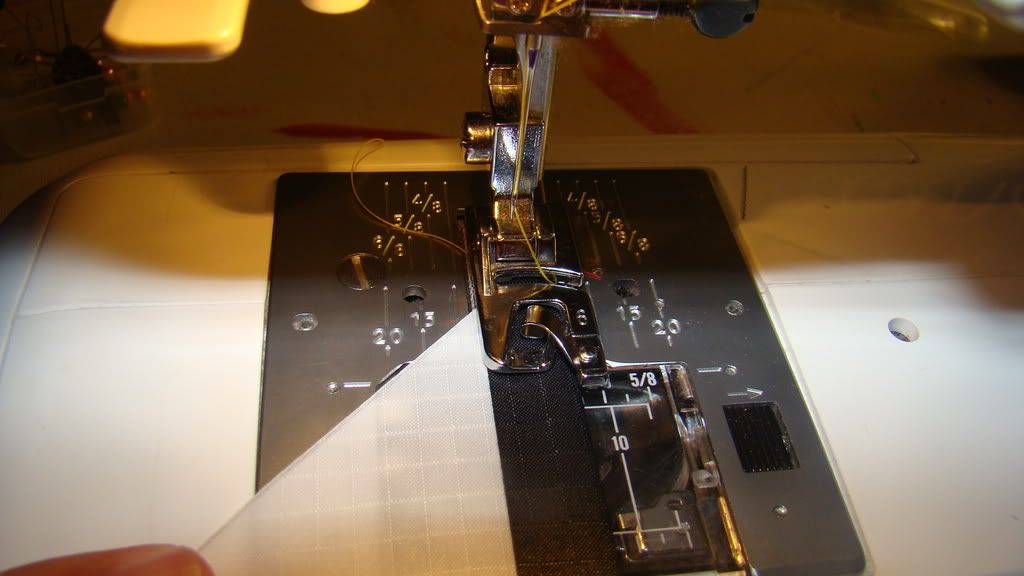
Here's a little better view showing the edge of the material against the fence on the foot:
Here's where it gets a *little* tricky and it takes practice. The first thing is to tug on the loose threads and make the lock stitch for the start of the run. This requires your hands to not be on the sail, so ONLY apply the lock stitch or get it started and then let off the pedal before re-positioning your hands as shown below.
After the lock stitch is made, I move my left hand to the position shown here. My index finger is gently "pulling" the edging strip to the left against the edge of the sail panel. My thumb is gently "pushing" the sail up into the crease. At the same time, I'm guiding the panel edge straight through and holding the binding crease against the fence on the foot. Not pictured is my right hand, which is guiding the folded edging onto the edge of the sail panel as it feeds forward into the machine. My right hand is just making sure the edging is over the edge of the sail panel, and when it gets to my left hand I'm making sure the two are where they are supposed to be relative to each other before going under the needle. It helps if you can set your machine to stop in the Needle Down position; particularly when I'm doing a long run of binding, I let off the pedal quite a bit and re-position my hands or make sure the binding is going on the edge of the sail correctly and what-not quite a bit (plenty of Stop & Go)
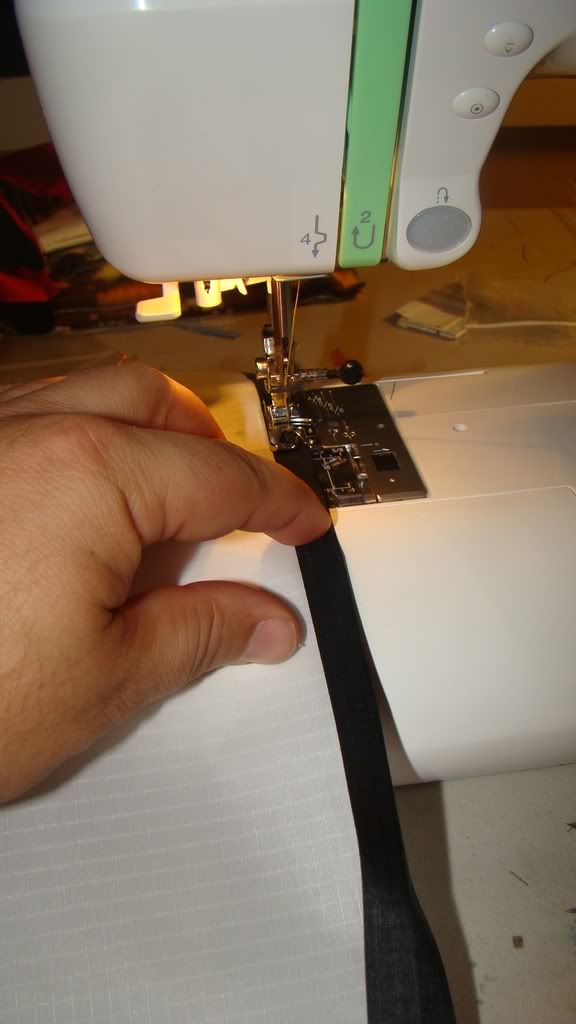
Here's how it came out; I didn't take the time to adjust the stitch length and width for these example pics. With some practice you can pretty well zap it through the machine. Curves aren't that much trouble at all; for the most part, the curve itself helps keep the material pressed up against your fence (easier to understand when you try it)
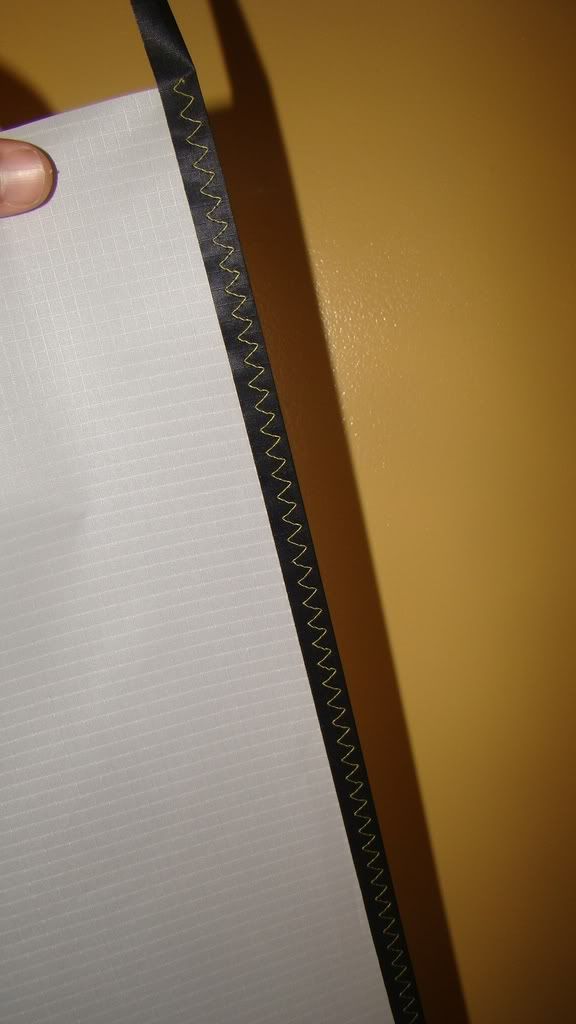
With a little practice, you can apply consistent binding at about Mach 3. Works great.
_________________
Simon
Discovering Something that Doesn't Exist...
Radix Lecti Rex |
|
| Back to top |
|
BANSHEE
Kite Builder II


Joined: 12 Oct 2006
Posts: 1441
Location: Wauwatosa, Wisconsin
|
| Posted: Sun Nov 15, 2009 11:47 pm Post subject: |
|
|
I'd like to add something here.When doing a wide zig zag I would suggest that you use a multiple stitch zig zag instead of a straight ZZ. This will keep the stitch from puckering, the multi stitch will give you a flat smooth run.
_________________
Banshee
Go All Blacks
Pete Pumpkin is Da Man |
|
| Back to top |
|
Pumpkin

Joined: 30 Oct 2006
Posts: 7991
Location: Birmingham UK
|
| Posted: Mon Nov 16, 2009 12:21 am Post subject: |
|
|
Posted a simple webbing binding guide a little while ago....made from a soft drinks can
Works well with RSN (single Fold) and Dacron as well
http://www.kitebuilder.com/forums/viewtopic.php?t=8033
Here is a version for 15mm (5/8" approx) Webbing

Also in the picture is a proprietary double fold binding maker...the type you're supposed to pull the tape through and iron (as Powder Pig showed above with his machine binder)........
I find I can bind n the fly with it..... start the double fold trap it under the pressure foot with the sail edge in the crease and start sewing..... you can pull and fold 3 -4 inches at a time then sew and it works surprisingly well for me.
_________________
Pete
Where did you say the string goes? |
|
| Back to top |
|
reynolds5520
Master Kite Builder

Joined: 09 Jul 2008
Posts: 1901
Location: USA, NY, Finger Lakes Region, Canandaigua
|
| Posted: Tue Dec 08, 2009 3:34 pm Post subject: Sharpening a dressmaker's pencil |
|
|
Do you use dressmaker's pencils like these?
I used to have a problem sharpening them. A standard pencil sharpener makes a point that is too long and skinny for these (like the top pencil in the picture below.) The soft material in these pencils would often break off in the sharpener before I even got a point. When I did get it sharpened to a point it would then break as soon as I tried to use it.
What is needed is a sharpener with the blunter angle that these pencils came with. Don Tuff turned me on to an inexpensive (~$2.50 US) and readily available sharpener. These eye liner pencil sharpeners are available in most drug stores here in the US.
They cut the correct angle, have what looks to be a good quality blade and are easy to carry with you to workshops.
They also have a clear plastic cover that catches the shavings and is easily emptied.
_________________
.
Kevin R
Recently Completed:
Square Beam No. 3 workshop at U-MAKE
Now on the table:
piles of unrelated stuff 
But some of it is chocolate
Next up (if I don't get sidetracked yet again - who am I kidding, I am ALWAYS sidetracked):
Probably a kite workshop somewhere...
Last edited by reynolds5520 on Tue Dec 08, 2009 3:41 pm; edited 1 time in total |
|
| Back to top |
|
powder_pig
Master Kite Builder
Joined: 16 Jun 2008
Posts: 5678
Location: Portland, OR, AKA Region 9
|
| Posted: Tue Dec 08, 2009 3:41 pm Post subject: Re: Sharpening a dressmaker's pencil |
|
|
| reynolds5520 wrote: |
I used to have a problem sharpening them. A standard pencil sharpener makes a point that is too long and skinny for these (like the top pencil in the picture below.) The soft material in these pencils would often break off in the sharpener before I even got a point. When I did get it sharpened to a point it would then break as soon as I tried to use it.
|
How did you solve the problem? 
_________________
Ron
It's sunny and windy in the summer and cold and snowy in the winter...this must be what heaven is like. |
|
| Back to top |
|
nckiter

Joined: 28 Feb 2005
Posts: 1157
Location: USA NC Apex
|
| Posted: Tue Dec 08, 2009 3:44 pm Post subject: |
|
|
Kevin,
What is your solution? Did you find a different type sharpener? I have had the same problems with a regular sharpener so I usually revert back to old carpenters habit of using a sharp knife to sharpen them.
_________________
Kip Clement
Apex, NC
Quads and SLKs |
|
| Back to top |
|
reynolds5520
Master Kite Builder
Joined: 09 Jul 2008
Posts: 1901
Location: USA, NY, Finger Lakes Region, Canandaigua
|
| Posted: Tue Dec 08, 2009 3:47 pm Post subject: Re: Sharpening a dressmaker's pencil |
|
|
| powder_pig wrote: | | reynolds5520 wrote: |
I used to have a problem sharpening them. A standard pencil sharpener makes a point that is too long and skinny for these (like the top pencil in the picture below.) The soft material in these pencils would often break off in the sharpener before I even got a point. When I did get it sharpened to a point it would then break as soon as I tried to use it.
|
How did you solve the problem? |
Sorry Ron,
You read the post while I was still editing. I had clicked on preview to make sure the pics were correct and the forum crashed on me. I used my browsers back button to recover where I was but had to submit it incomplete and then edit to get it done without losing anything.
You were just too quick! The post above now continues to the sharpener that works.
_________________
.
Kevin R
Recently Completed:
Square Beam No. 3 workshop at U-MAKE
Now on the table:
piles of unrelated stuff
But some of it is chocolate
Next up (if I don't get sidetracked yet again - who am I kidding, I am ALWAYS sidetracked):
Probably a kite workshop somewhere... |
|
| Back to top |
|
nckiter
Joined: 28 Feb 2005
Posts: 1157
Location: USA NC Apex
|
| Posted: Tue Dec 08, 2009 4:45 pm Post subject: |
|
|
Thanks Kevin, great tip, I always thought somebody must make a blunt sharpener just didn't know where to look.
Just one thing tho',
Considering the occasional sideways glances I (we) get as I (we) wander among fabrics, perusing ribbons, selecting machine needles, and checking out new quilting rulers, guides, etc.. What kind of looks do you reckon I (we) should expect when we ask for the make up aisle? 
_________________
Kip Clement
Apex, NC
Quads and SLKs |
|
| Back to top |
|
reynolds5520
Master Kite Builder
Joined: 09 Jul 2008
Posts: 1901
Location: USA, NY, Finger Lakes Region, Canandaigua
|
| Posted: Tue Dec 08, 2009 4:52 pm Post subject: |
|
|
| nckiter wrote: | | What kind of looks do you reckon I (we) should expect when we ask for the make up aisle? |
The method I used was to distract everyone at the cash register with a discussion of how much cash they can give me back when I use a debit card. That, and I bought a chocolate bar too.
_________________
.
Kevin R
Recently Completed:
Square Beam No. 3 workshop at U-MAKE
Now on the table:
piles of unrelated stuff
But some of it is chocolate
Next up (if I don't get sidetracked yet again - who am I kidding, I am ALWAYS sidetracked):
Probably a kite workshop somewhere... |
|
| Back to top |
|
nckiter
Joined: 28 Feb 2005
Posts: 1157
Location: USA NC Apex
|
| Posted: Tue Dec 08, 2009 5:03 pm Post subject: |
|
|
_________________
Kip Clement
Apex, NC
Quads and SLKs |
|
| Back to top |
|
powder_pig
Master Kite Builder
Joined: 16 Jun 2008
Posts: 5678
Location: Portland, OR, AKA Region 9
|
| Posted: Tue Dec 08, 2009 6:06 pm Post subject: |
|
|
| nckiter wrote: | | What kind of looks do you reckon I (we) should expect when we ask for the make up aisle? |
If you walk like a runway model through Joanne's, nobody gives you a second look.
_________________
Ron
It's sunny and windy in the summer and cold and snowy in the winter...this must be what heaven is like. |
|
| Back to top |
|
kiteguy
Kitebuilder of the Year 2005
Joined: 16 Sep 2003
Posts: 8805
Location: USA - Kansas, Overland Park - Near Kansas City
|
| Posted: Tue Dec 08, 2009 6:10 pm Post subject: |
|
|
Actually, I have done applique with a soldering iron. No sewing involved.
Admittedly, it was with plastic, not ripstop nylon. And I have to admit my results were nothing to brag about. However, I have seen others do it, and the results were great. Certainly bragable. (Is there such a word? Surely not.)
_________________
[
Dave Ellis
Kites + Kids = Education |
|
| Back to top |
|
|